Philip's lights made with new oak railway sleeper posts
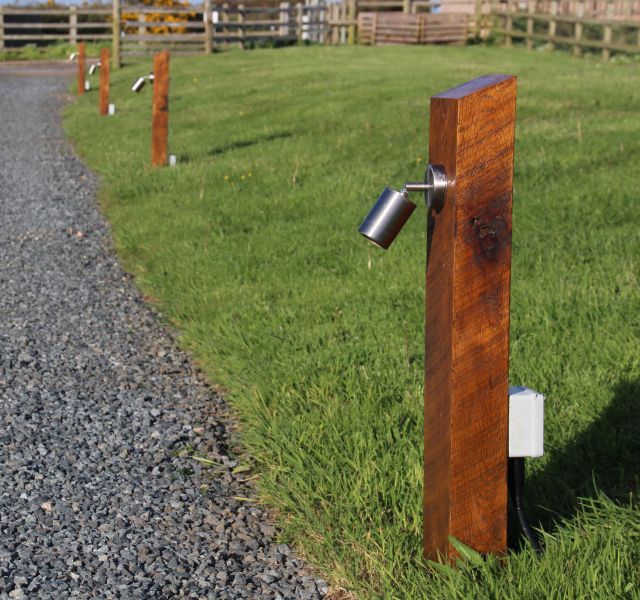


I thought you might like to see what we've used some of your new oak sleepers for. We needed to replace some lighting along a driveway - the previous owners of the property had used alumimium posts bolted down to a concrete base, but those posts had long since deteriorated as the property is close to the sea and anything non-stainless tends to fall apart after a year or two. I'd looked at various off-the-shelf wooden bollard lights, but these typically cost over £400 each, and even then there's no guarantee that the metal parts are high grade stainless steel.
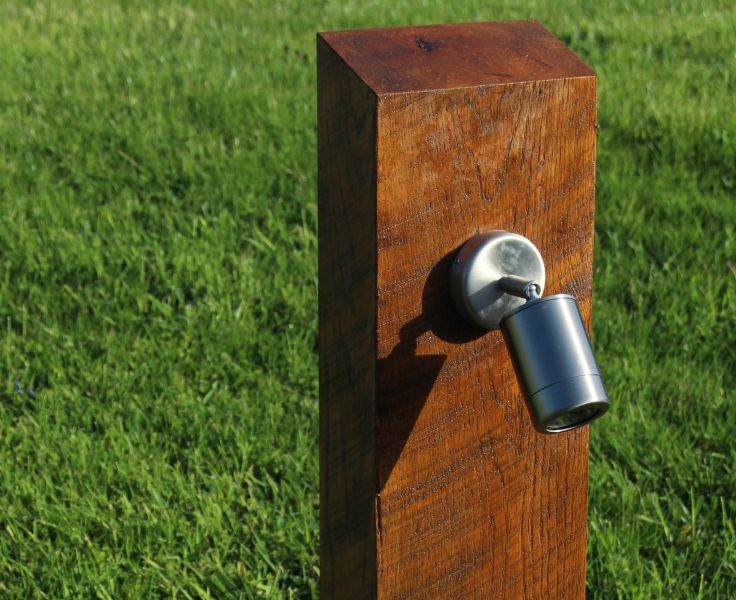
My solution was to use some of your new oak railway sleepers (1200 x 200 x 100) for the posts, and attach marine grade stainless steel lights. We angled the ends with a mitre saw to allow rain to run off, then smoothed the sleepers off with a belt sander. They were then treated with 2 coats of clear Barretine wood preservative, and when that was dry they were finished with 2 coats of Osmo UV Protection Oil. This has given the timber a darker colour than the fresh oak, but it will slowly fade over the next year or two. I dug a hole about 45cm deep for each sleeper post, and about 5cm wider each way than the sleeper. The sleepers are sunk about 40cm in gravel, not concrete, to allow water to drain freely away; the gravel was rammed down so that the posts barely move even if pushed hard. The lights used are Saxby Atlantis units, which are made of 316L marine stainless steel.
The total cost for each post plus light is well under £100, including VAT, so a fraction of the cost of an off-the-shelf wooden bollard light, and we know the type of timber and metal used throughout, which would not be the case for an off-the-shelf bollard light. The only other cost incurred was for the rental of a breaker, which I needed to use to dig out the old concrete bases which the previous owners' aluminium posts had been attached to.
Although I think they look great, it's noticable that the railway sleepers have been cut with a circular saw as the blade marks are still visible on the face of each post. I'm sure that these could be sanded or planed off given a lot more time and effort, but that wouldn't have been necessary if the railway sleepers were cut with a band saw. With hindsight I should have asked how the sleepers were cut.
Thanks again,
Philip White
Cornwall
RAILWAY SLEEPERS USED
New oak railway sleepers - 1.2m x 200mm x 100mm
RailwaySleepers.com Says..
Many thanks for the pictures and your generous and meticulous description of your railway sleeper project. Your lights look simply spectacular, and it feels particularly satisfying to know that you have created something that is considerably cheaper and better made than any off the shelf equivalent. I take your point about the marking on the oak railway sleepers of circular saw cutting as opposed to bandsaw cutting, but personally I love the patterned effect that it gives on your lighting posts. Very impressive.