
Seven ways of fastening railway sleepers together!
.jpg)
.jpg)


There are many different ways of fixing railway sleepers together. Some people fasten railway sleepers together with bolts or Timberlok Screws. Others use steel angle brackets or steel flat connector plates. Some people use wooden stakes to support their railway sleeper creations, whereas others slot their railway sleepers into steel 'I' or 'H' beams. Some people use traditional wooden dowels that have been used for 1000's of years (or metal rebar), whereas other people prefer concrete. And of course some people put their faith in simple gravity, that has served this planet well for billions of years. A myriad of choices and options of how to assemble your wonderful railway sleeper masterpiece!
The Magnificent Seven!
1) Bolts or screws
2) Brackets & steel plates
3) Posts or stakes
4) Steel 'I' beams or RSJs
5) Wooden dowels or Steel rods
6) Concrete
7) Pure gravity
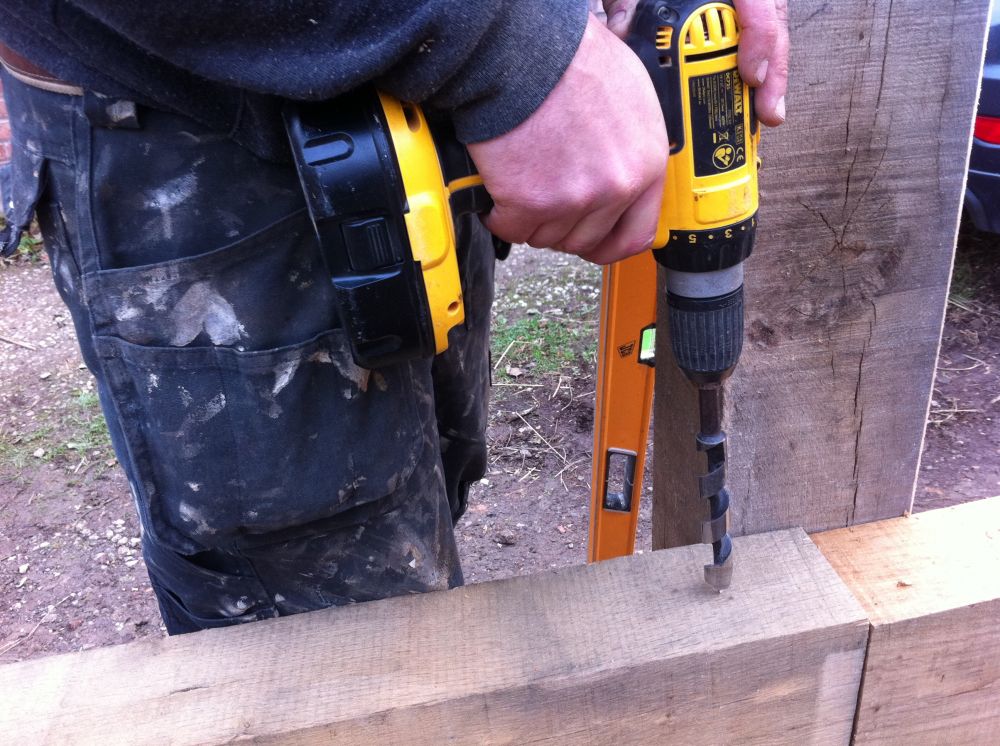
1) Bolts or screws 
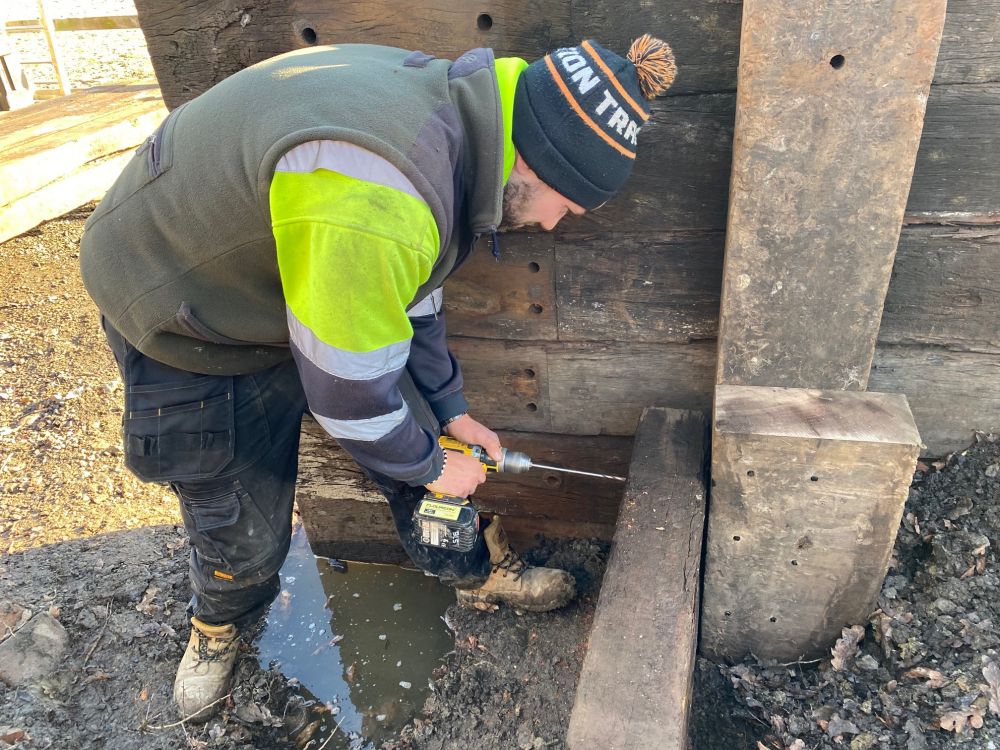
 This is probably the most common and popular way of fixing railway sleepers together. In the past when we were asked how to fasten railway sleepers together we would have recommended coach bolts. NOW we always say 'TIMBERLOK SCREWS'. I know that that seems really cheesy, like "I always use Persil to remove those stubborn stains", but genuinely they ARE fantastic. They are in effect like a coach bolt that you can drive in with a drill. When we first received a visit from TimberLok's secret agents, we decided to set them a tough test:
1) "Drill through softwood railway sleepers". Their screws easily went through pine railway sleepers without pre-drilling, and pulled the screw heads flush with the surface.
2) "Drill through something harder! Try Oak, Jarrah, & Azobe railway sleepers"
We found that the screws STILL went in, although with more of an effort. These hardwood railway sleepers are much tougher than softwood, with more pressure put on both the drill & screw. We did find that the concrete-like hardness of the Azobe caused several screws to sheer, so our advice would be to pre-drill a pilot hole in oak and tropical hardwood.
.jpg) OUR CONCLUSION: "Genuinely great!"
OUR CONCLUSION: "Genuinely great!"
- they install much faster and easier than coach screws or coach bolts.
- they generally requires no pre-drilling (except in the case of dense hardwoods).
- they countersink flush into all but the hardest timbers.
- they draw warped beams down and can normally be removed and reused.
- designed not to rust in pressure treated timber, except in saltwater settings.
- the 'anti-friction topcoat' allows it to penatrate hardwood more easily than other screws.
TOP SECRET! The TimberLok secret agent went on about titanium and the space rocket or something.. Hi-tec you see...!
DRILL requirements
 1) You must use a drill that is sufficiently powerful - with high torque and low speed settings. This would tradionally be a mains drill, although now there are often powerful 18v and 24v rechargeable drills that are also very effective.
 2) You must pre-drill any hardwood railway sleepers that are particularly tough (e.g. Azobe and tropical hardwood) with a 6mm wood drill that will ease the insertion of the screw (you can order one of these on the website), otherwise the screws may get stuck or potentially snap. Drill into the railway sleeper about a cm at a time, and then withdraw the wood drill, so as to clear the wood shavings from the hole, and then drill a bit further. If you don't do this, the drill may overheat, smoke, and eventually bend, snap or go blunt.
3) Even if you pre-drill the railway sleeper with a pilot hole, you may still also have to countersink the head of the Timberlok screw, as the actual hexhead may not pull itself flush into really hard Azobe or tropical hardwood railway sleepers.
4) If you manage to insert the TimberLok screws into very hard railway sleepers without pre-drilling, and then you decide to take them out at a later date, you may find that the screw sheers or snaps.
Tips for choosing the size of TIMBERLOK SCREW
Only 50mm of the end of the screw actually screws into the railway sleeper. So, if you want to attach, say, a 150mm thick railway sleeper to another railway sleeper, you will need a 200mm screw. (The 50mm end of the timberlok will go all the way through the first 150mm thick railway sleeper, and then screw 50mm into the second railway sleeper, and then clamp them together) Ring us if you're unsure!
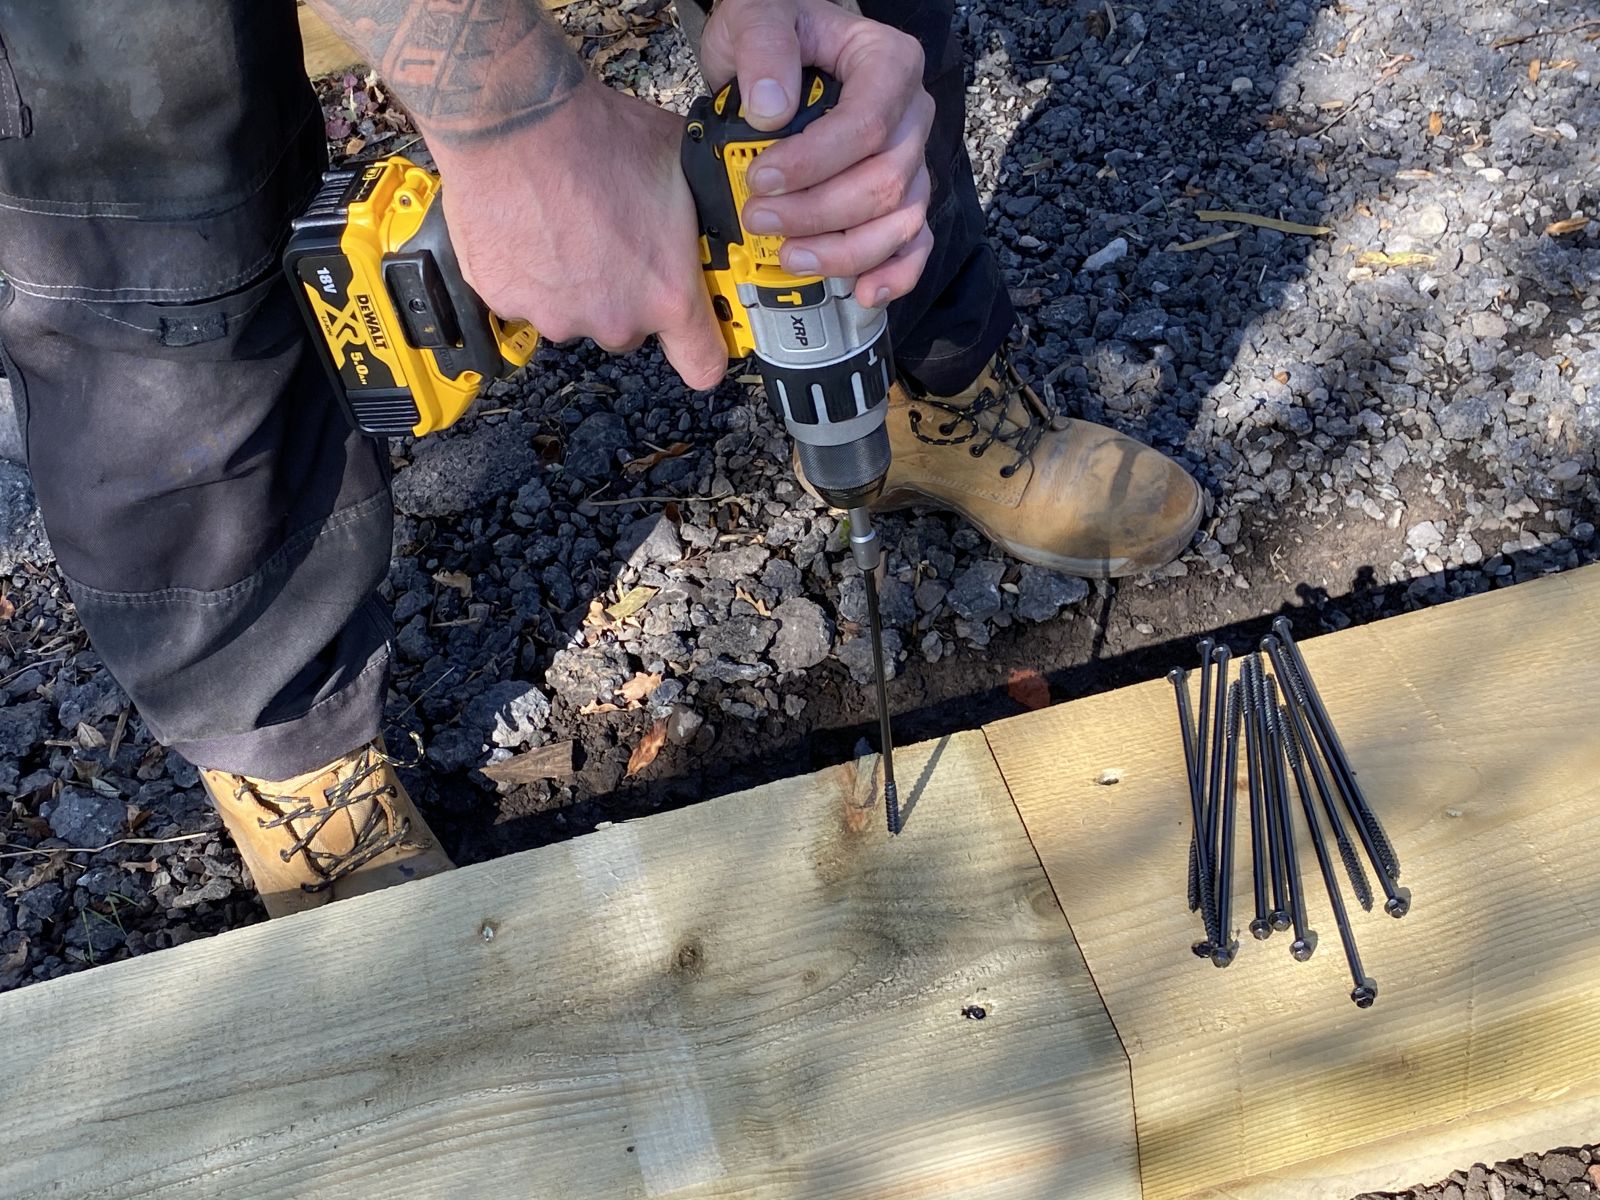 It is easier to unscrew a TimberLok screw that has been put into a softwood railway sleeper (e.g. new pine) than into hardwood (e.g. oak). These screws tighten up so powerfully, locking together the sleepers with enormous pressure, that in a hardwood, it sometimes almost 'welds' itself to the railway sleeper making it harder to screw it out again. So, make sure everything's correctly in position before you screw it up tightly.
PAY A VISIT TO OUR TIMBERLOK SCREWS PAGE
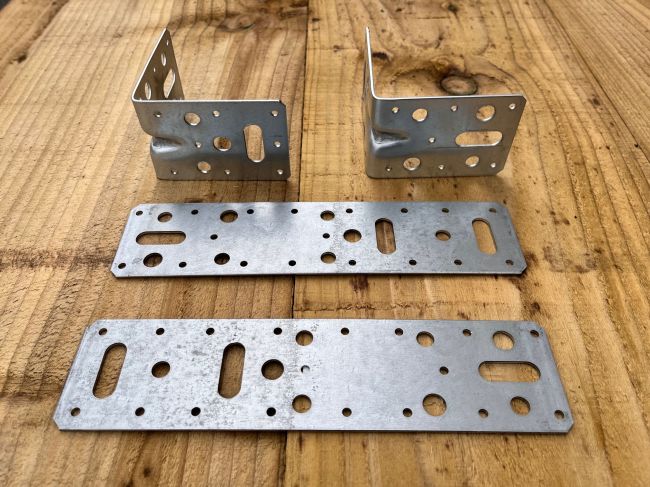
2) Brackets & steel plates
.jpg)
 A simple way of connecting railway sleeper corners together or connecting different lengths or layers of railway sleepers.
Angle brackets are ideal for 90 degree connections in raised beds or retaining walls where you want to create a strong corner joint, either instead of, or as well as Timberlok railway sleeper screws. Each of our angle brackets has:
15 x 3.7mm nail holes. 4 x M8 bolt holes. 3 x M10 bolt holes. 2 x M10 bolt slots.
They are 90mm x 90mm, with a width of 62mm and a steel thickness of 2mm.
 Flat connector plates are useful for connecting different layers of railway sleepers together, when they are stacked on top of each other. They are also perfect for connecting together a run of railway sleepers, where there are 2 or more in a straight line, and you want to make the join as rigid as possible.
Each flat connector plate has:
19 x 3.7mm nail holes. 5 x M8 bolt holes. 3 x M10 bolt holes. 3 x M10 bolt slots
They are 240mm long, with a width of 62mm and a steel thickness of 2mm.
PAY A VISIT TO OUR STEEL CONNECTORS PAGE
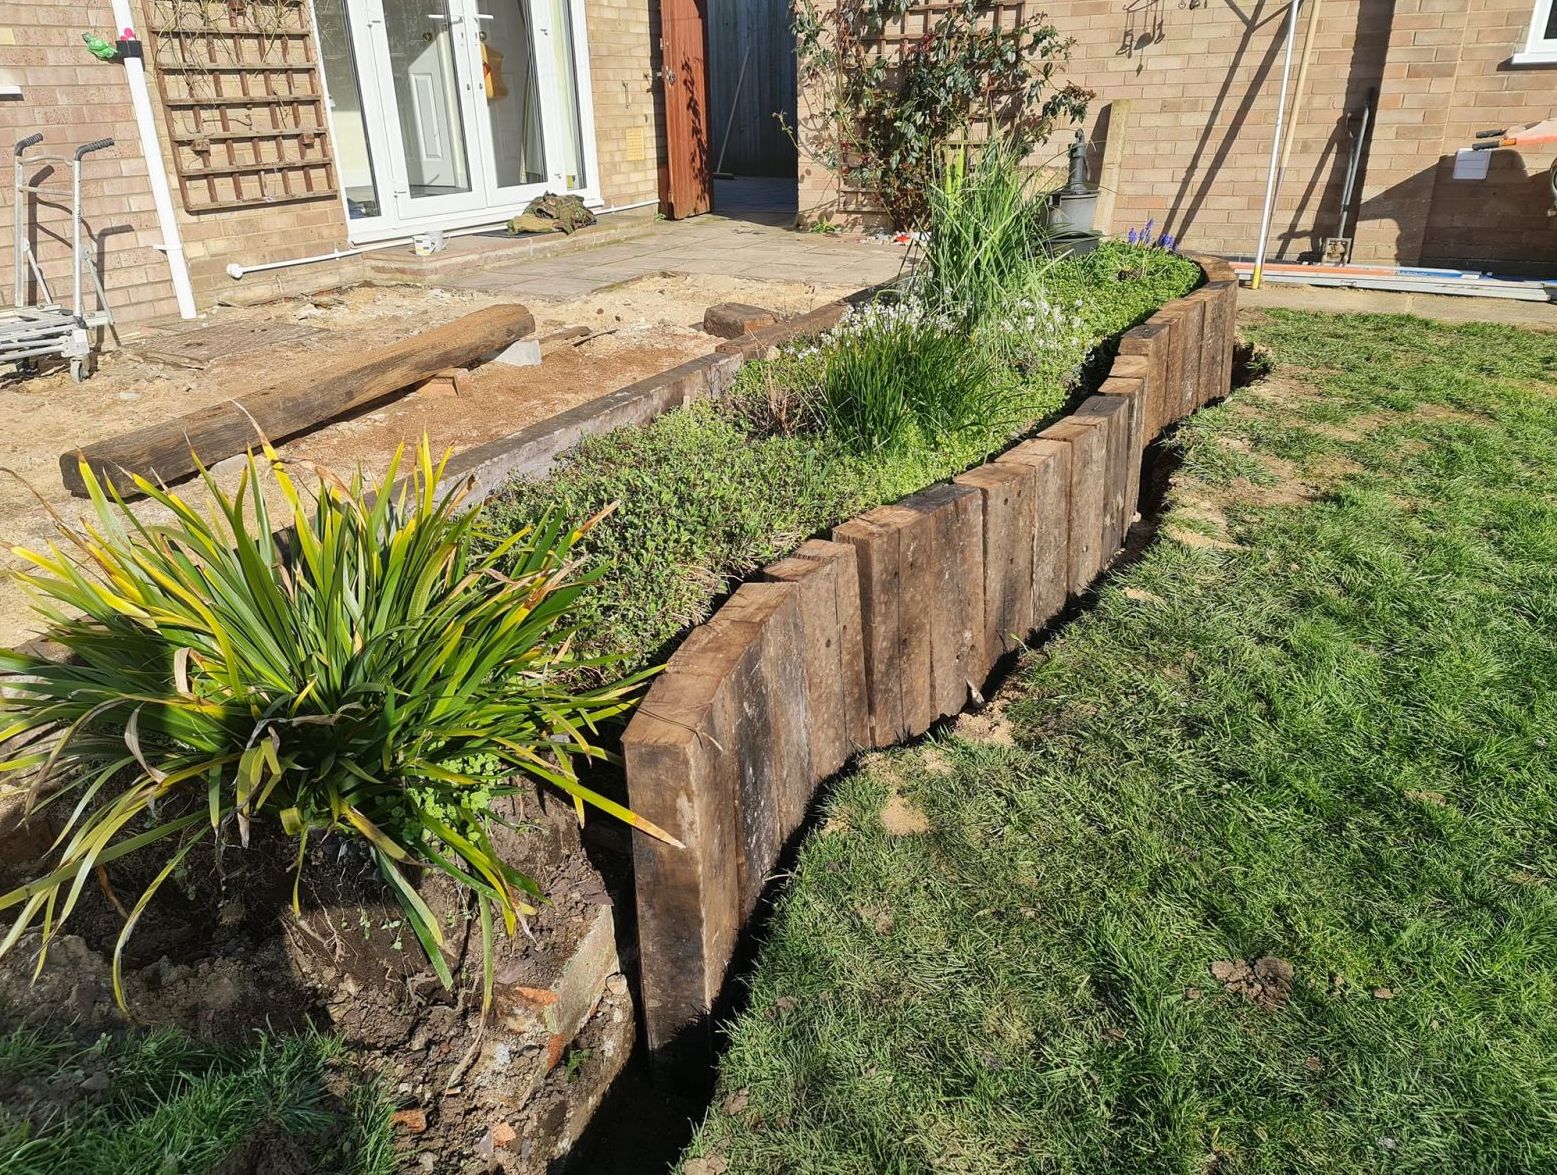
3) Posts or stakes
 Using wooden posts, wooden stakes or railway sleepers are a common way of fixing railway sleepers together.
1) In really low level projects you will find that 50mm x 50mm stakes are really useful in holding your railway sleepers in place. Simply knock them into the ground and screw the railway sleeper to them.
2) If you are planning to stack your railway sleepers a little higher on top of each other, then they will require more support to stop them leaning forward or toppling over, and your retaining posts need to be stronger. That is where people 'move up' to 100mm x 100mm traditional fence posts, which are thicker and longer lasting. You will need to concrete them into the ground, as you would a fence post, and fasten the stacked railway sleepers to them.
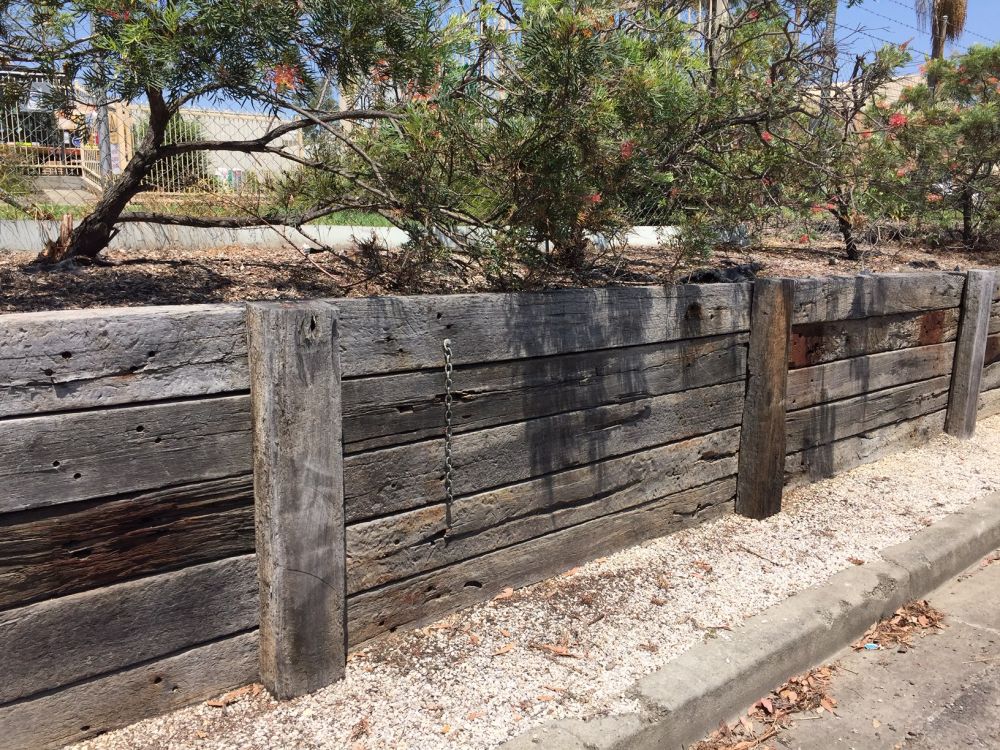
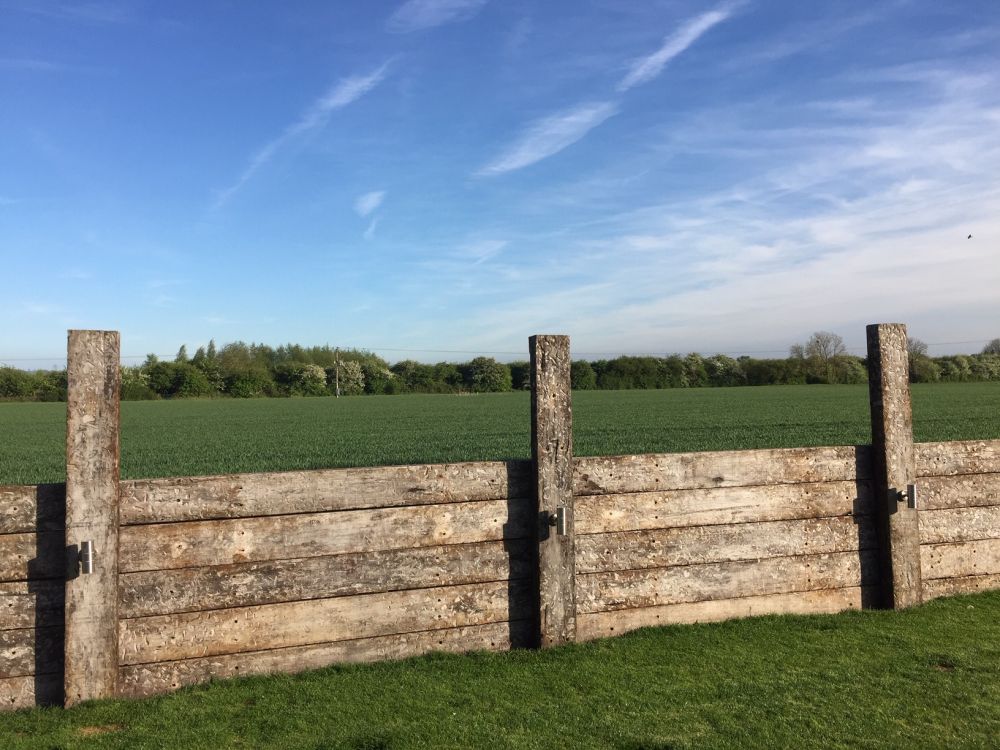 3) However, if your railway sleeper wall is going to be more substantial, structural or higher most landscapers and builders will use actual railway sleepers as the sturdy and durable retaining posts. The strength and longevity of these railway sleeper retaining posts are vital in these projects. Again, simply dig a hole and fix the vertical railway sleepers in place with a dry mix concrete, e.g. Postcrete. How deep do you concrete them into the gound? As a rough rule of thumb, try a third into the ground and two thirds out. So with a 1200mm high wall, the retaining post (railway sleeper) would be concreted a minimum of 600mm into the ground. When the vertical railway sleepers have been set in concrete you can simply stack the horizontal railway sleepers against the retaining posts, on their narrow edge or wider edge, and then fasten them to the post with Timberlok sleeper screws.
Which railway sleepers would be best for retaining posts?
PAY A VISIT TO OUR 'WHICH RAILWAY SLEEPERS ARE BEST?' PAGE.
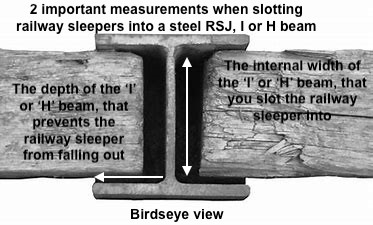
4) Steel 'I' beams or RSJs
What does 'RSJ' mean?
RSJ = Rolled Steel Joist. I-beam or H-beam = the actual shape or profile of the steel beam, i.e. the cross section looks like an 'I' or an 'H'. A common type of beam used for structural steelwork. Years ago, you would probably only see railway sleepers slotted into steel beams in commercial warehouses or builders merchants and farmyards. But now they are increasingly being used in home projects to build garden walls.
Pros and Cons of using steel RSJ or I-beams with railway sleepers?
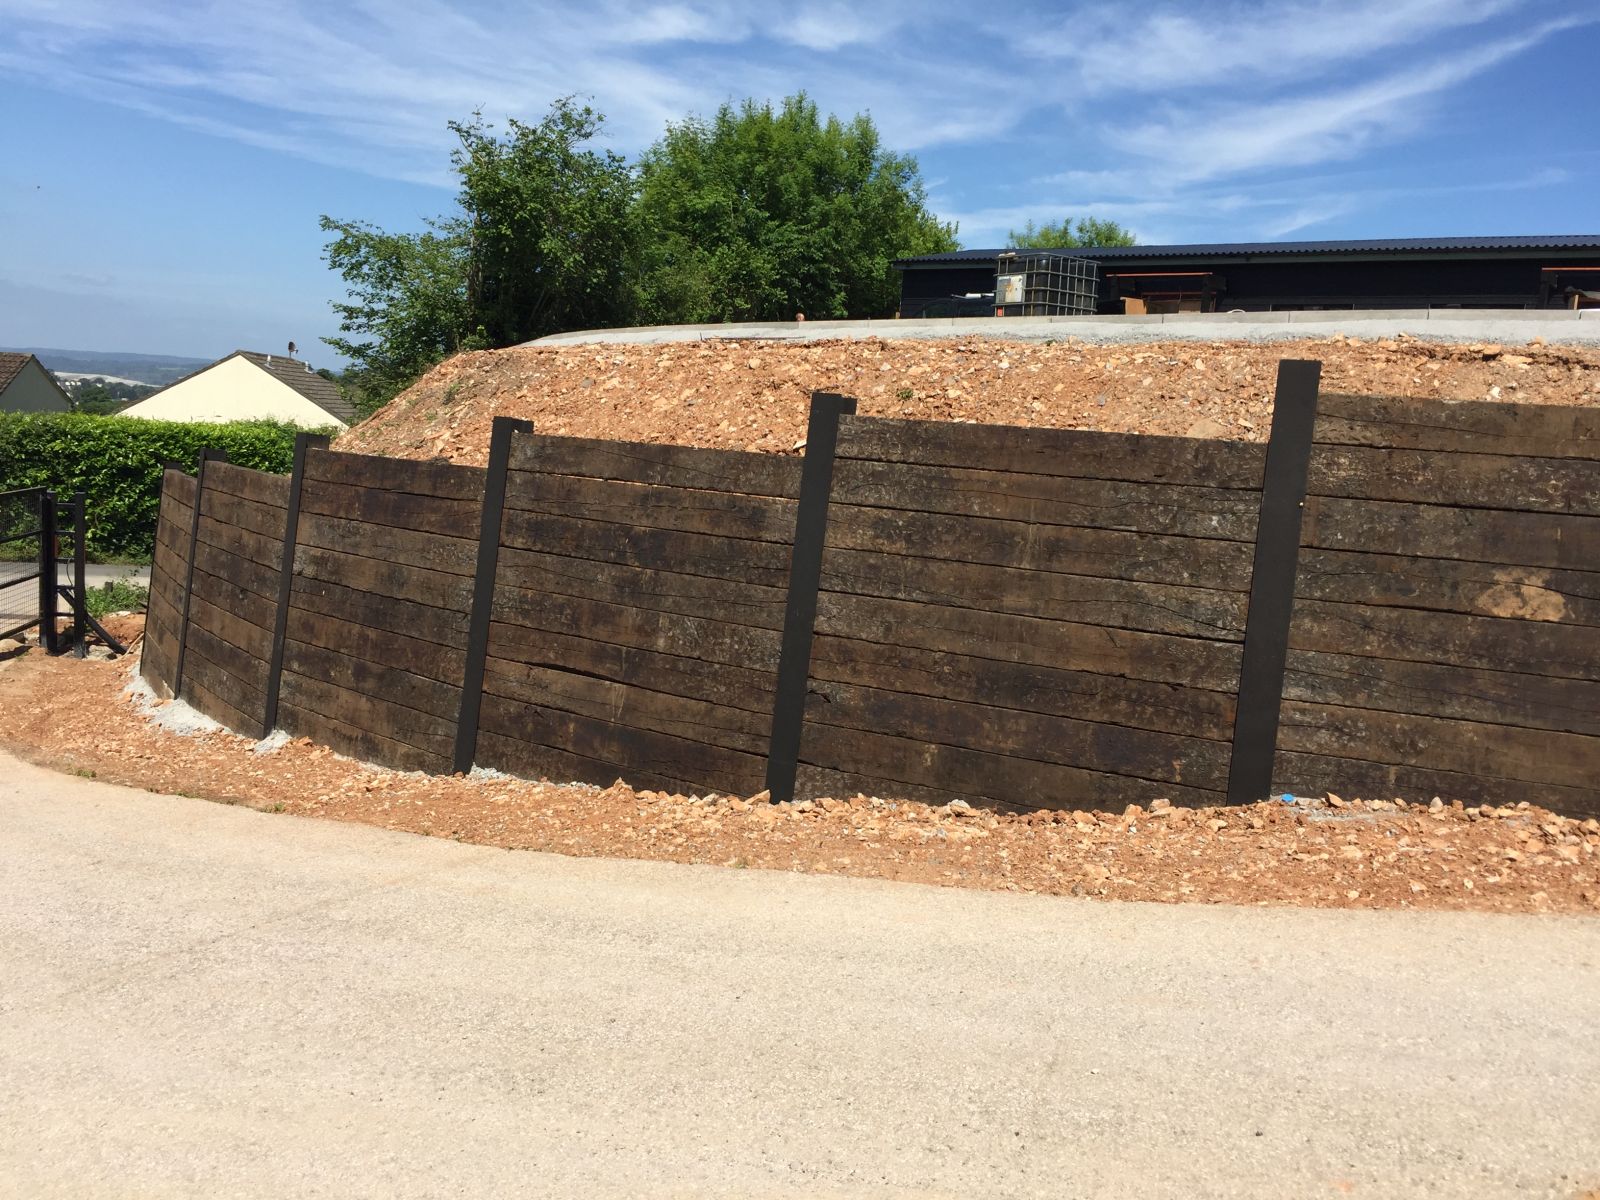 PROS:
PROS:
1) Very easy to construct with. Simply concrete i-beams into ground and slot in railway sleepers. (Similar to building a fence with concrete slotted fence posts)
2) Very strong & longlasting, epecially with high walls. RSJs are often used to shore up rivers & pontoons.
3) Easy removal of railway sleepers. They can be easily replaced in the future.
4) Very rigid. RSJs help to prevent the railway sleeper wall from twisting, warping or buckling.
5) Good for the planet. RSJs are made from 100% recyclable steel.
CONS:
1) Expensive to buy. Steel RSJ and I beams can make a hole in your budget.
2) Heavy to lift and install. You'll need sufficient people or lifting equipment
3) They can rust and discolour over the years.
4) They can look industrial or factory-like. This can stand out in a natural looking garden or patio.
PAY A VISIT TO OUR RSJ AND I BEAMS WITH RAILWAY SLEEPERS PAGE
How do you build a wall with steel RSJ or I-beams & railway sleepers?
 Constructing a wall out of steel RSJs and railway sleepers is pretty straightforward. DON'T BE TEMPTED to concrete in the steel beams until you've received & measured the railway sleepers and worked out the correct spacing sizes. Otherwise you may find they don't fit, which is going to be a real pain!
1) Measure the length of all the railway sleepers, and calculate how far apart the steel RSJs need to be. You need to take into account the different size variations, especially if you are using reclaimed railway sleepers, as they are more irregular, e.g. if a railway sleeper is described as 2.6m x 250mm x 150mm (approx), then possibly the 2.6m may be 2.58m or 2.62m. This will affect the distance required between the steel beams, when you concrete them in, and thus the ease of sliding the railway sleepers into the RSJs. That's why we urge you to measure the railway sleepers BEFORE you fix the RSJs! Likewise the 150mm thickness could actually be 140mm or 160mm, so allow for tolerance when you order the size of your steels. Nothing worse than a railway sleeper that is jammed half way through the 'sliding in' process, or one that falls out or one that has to be painstakingly trimmed to length.
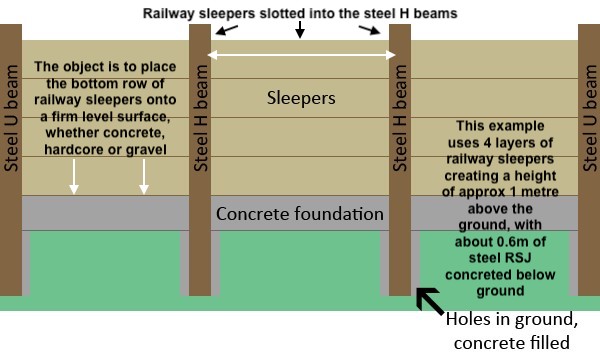 2) Mark out the position of the holes in the ground, using a string line and stakes, and dig to the required depth. There isn't a depth calculation that fits all scenarios, as there are many variables, e.g. a) the height of the wall, b) the weight & pressure of the earth or material the wall is holding back, c) the structure or firmness of the ground you are digging the hole into (sandy, rock, clay etc..). As a very rough rule, some landscapers work on a calculation of at least half the height of the wall being used to determine the depth of the hole. e.g. a 1m wall will have the RSJs sunk in at least 0.5m into the ground. Other landscapers and structural engineers may err on the side of caution, and sink the steels in as deep as the wall is high. e.g. a 1m wall will have the RSJs sunk in at least 1m into the ground. Therefore, half of the steel beam will be underground, and half will be above. Our advice would be to sink them into the ground as deep as possible, and if the wall is holding back a substantial weight, then maybe take advice from a structural engineer. NB. BE CAUTIOUS about how many steel beams you concrete in at a time, so as to avoid the risk of getting the spaces wrong, as you discover some of the railway sleepers are longer or shorter.
3) Lower the steel RSJ into the hole, ensuring it is exactly vertically positioned using tape and spirit level and then backfill with a dry concrete mix, that you can ram down around the steel beam untill the RSJ is rigid. The advantage of a dry cement mix is that whilst positioning the beams, you can take them out and re-position them without getting wet concrete everywhere. If the ground is damp, the concrete will gradually soak up moisture and set without having to add water. If not, simply use a watering can or hose.
4) If you are choosing to place the slotted railway sleepers onto a base of concrete, hardcore or gravel, then you need to prepare this first by digging a shallow trench between the steel beams and filling it with your base material. So saying, there are people who choose not to do this, and simply slot the railway sleeper onto soil or grass etc...
5) Slotting railway sleepers into the sections of the steel beams is simple on paper, but heavy in practice. Take care of your back and fingers, and use sufficient lifting power, whether enthusiastic helpers or willing machines. The thickness of the railway sleeper has to be less than the width of the steel beam, otherwise it won't slot in. However IF there is a large gap behind the railway sleeper, after you have slotted it in, some people choose to knock in wooden wedges to keep the railway sleeper tight up against the front face of the RSJ. There again, others accept that that weight and pressure of the soil or material you are holding back, will naturally push the railway sleeper forward and hold it in place against the steel beam, and don't bother! Your choice.
6) Remember to think about drainage. If there's going to be water building up behind the wall, where will it go? Some people place a layer of pea gravel, or perforated drainage pipe at the base of the railway sleeper wall, before backfilling with soil, so that the water can be channelled out. Otherwise you are creating a potential dam, which would be impressive if you decide to harness the water flow as a hydro-electric power project for the National Grid, or to generate environmentally friendly megawatts for the fairy lights in your garden shed. If not, allow space for it to gently soak away without saturating the railway sleepers. Sometimes the bottom of the wall can be a useful place to get rid of unwanted rubble or bricks. Saves on a skip, and encourages drainage!
PAY A VISIT TO OUR PROJECTS WITH RAILWAY SLEEPERS & STEEL I-BEAMS/RSJs PAGE
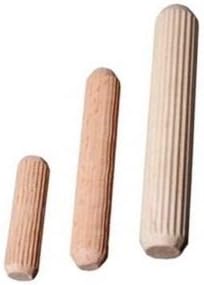
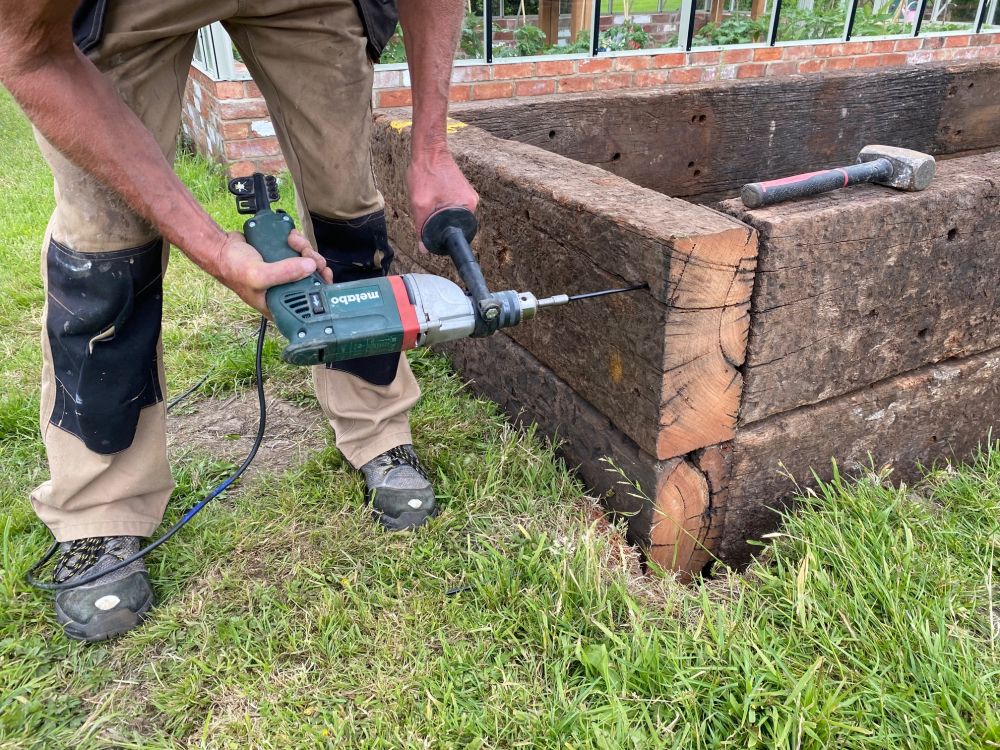
5) Wooden dowels / steel rods
.jpg) Wooden dowels (or wooden pegs) have been used to fasten timbers together for thousands of years, whether for buildings, boats or furniture. Fast forward, and you will still see them in mass produced wardrobes and beds from Ikea and other companies. Occasionally you can still see them used to connect railway sleepers together, especially if the landscaper has a background in joinery, and takes pride in traditional methods. Both railway sleepers overlap with a half lap joint, and then the joint is beautifully held together by wooden dowels.
Wooden dowels (or wooden pegs) have been used to fasten timbers together for thousands of years, whether for buildings, boats or furniture. Fast forward, and you will still see them in mass produced wardrobes and beds from Ikea and other companies. Occasionally you can still see them used to connect railway sleepers together, especially if the landscaper has a background in joinery, and takes pride in traditional methods. Both railway sleepers overlap with a half lap joint, and then the joint is beautifully held together by wooden dowels.
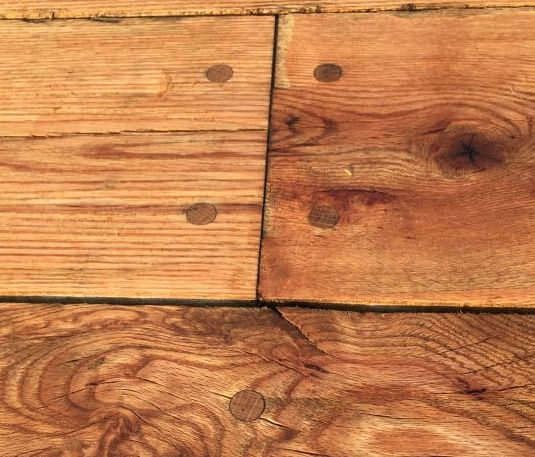 In truth, most landscapers don't have the time (or inclination) to go down this traditional route, preferring to simply and quickly screw everything together. However there is a compromise sometimes made by those who want to hide their screw heads and visually want the dowel look. They drill a 15mm hole about 30mm deep, place the screw within that, and connect the railway sleepers together. Then they knock a 15mm diameter wooden rod into the hole, trim it, sand it flush, and hey presto you have a neat wooden dowelled finish, with not a hint of a metal screw head. Some purists may say it's cheating, but hey, I wouldn't lose any sleep over that!
.jpeg) In the construction world it is more common to use steel rebar (concrete reinforcing rods) in structural work, and so some builders and landscapers 'borrow' this in their railway sleeper projects. They may drill through several layers of railway sleepers, and then knock through a steel rod to hold it all together (similar to a wooden dowel). Alternatively they may sink vertical steel rods into a concrete foundation and then slot pre-drilled railway sleepers onto them, as a way of fixing the base layer of a railway sleeper wall or raised bed to the ground.
In the construction world it is more common to use steel rebar (concrete reinforcing rods) in structural work, and so some builders and landscapers 'borrow' this in their railway sleeper projects. They may drill through several layers of railway sleepers, and then knock through a steel rod to hold it all together (similar to a wooden dowel). Alternatively they may sink vertical steel rods into a concrete foundation and then slot pre-drilled railway sleepers onto them, as a way of fixing the base layer of a railway sleeper wall or raised bed to the ground.
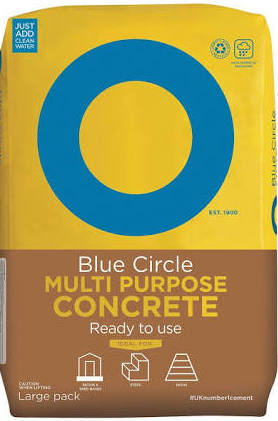
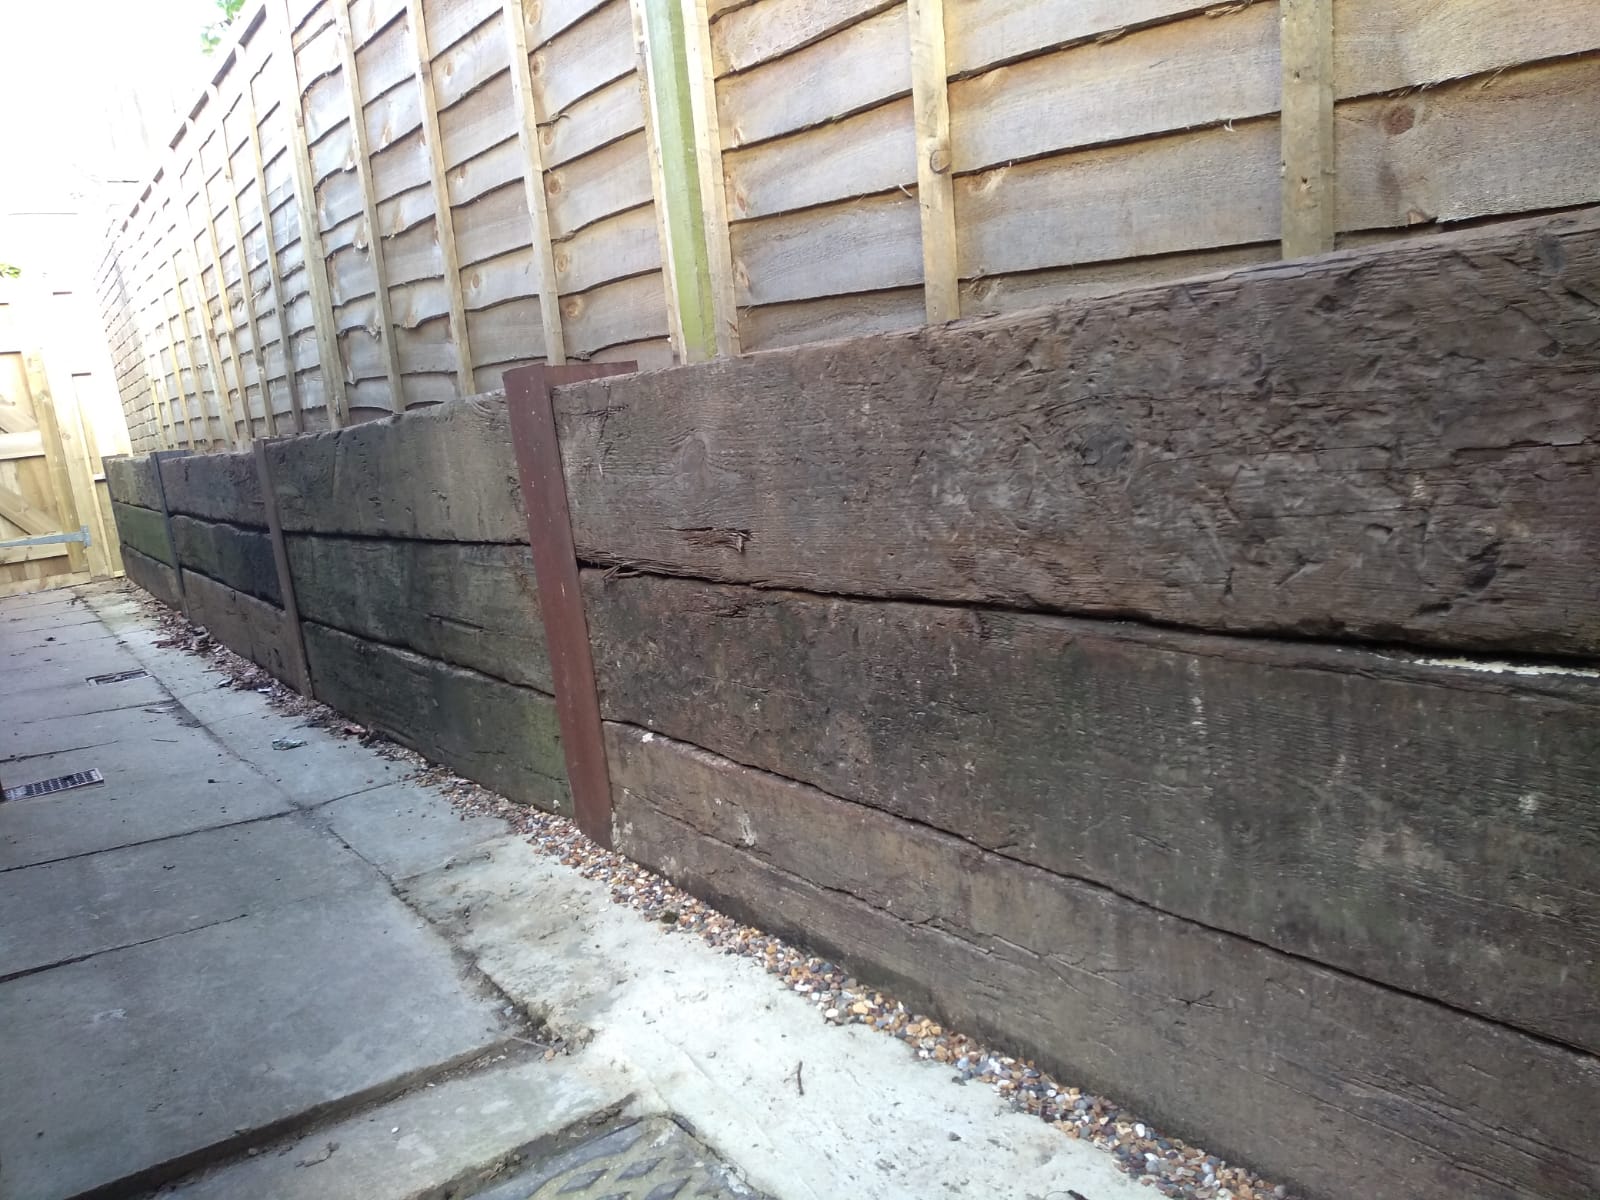
6) Concrete
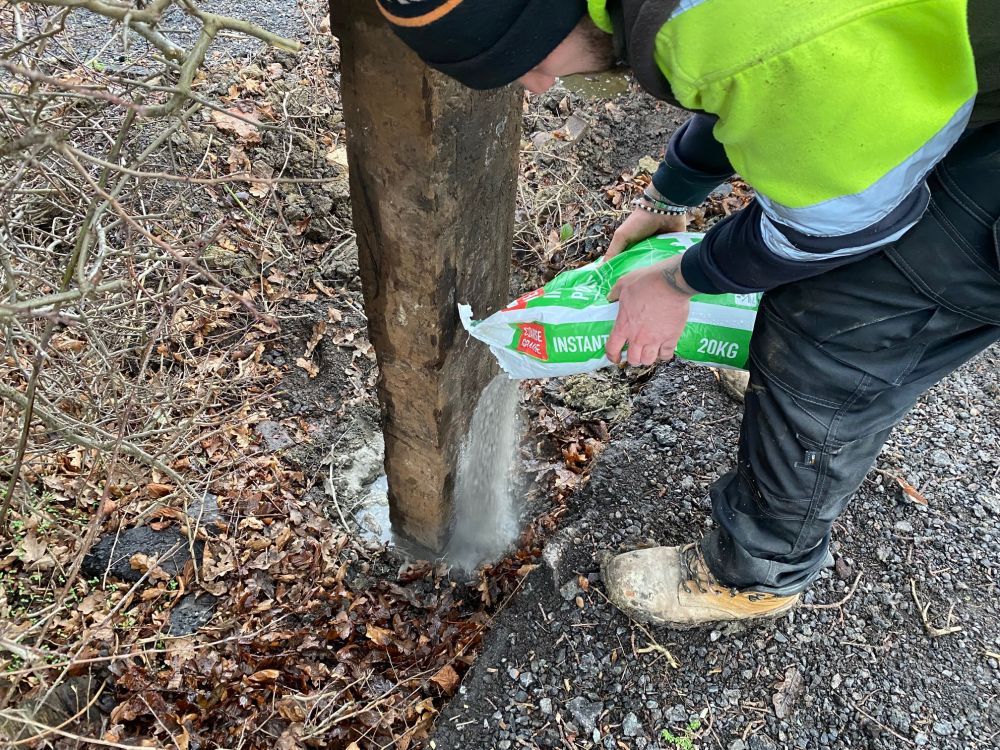 Fixing railway sleepers into the ground with concrete is a tried and tested way of landscaping. Let's take walls as an example. Constructing a retaining wall out of upright railway sleepers is pretty straightforward. Simply dig a trench, lower the railway sleepers in vertically side by side, and then backfill with a dry concrete mix, that you can ram down around the railway sleepers until the wall is rigid. The advantage of a dry cement mix is that whilst constructing the wall, you can take out and re-position the railway sleepers without getting wet concrete everywhere. If the ground is damp, the concrete will set without having to add water. If not, simply use a watering can or hose.
 The depth of the trench depends on the height of the wall, and the pressure of the earth or material you are retaining. Allow for when the ground is sodden, and the pressure increases. Some landscapers go with the saying: 'one third in the ground, and two thirds out'. So, you'd probably need to be thinking of putting the railway sleepers in about 0.5m in the ground if the railway sleeper wall is 1m high.
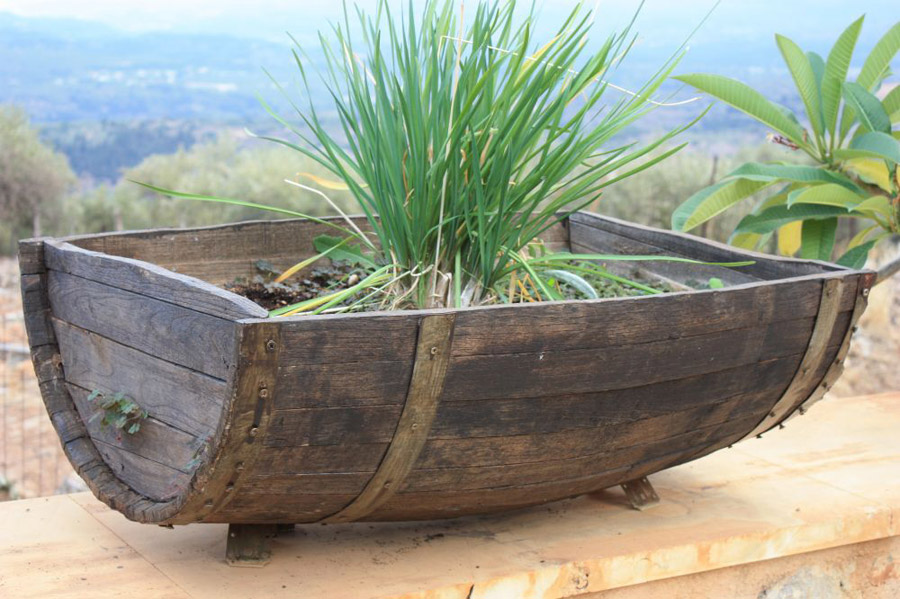
Although concrete is normally used to hold railway sleepers in place, whether lying on the ground, or fixed vertically, there are incredible examples of landscapers who have used smaller lengths of railway sleepers as 'bricks', and have stuck them together with mortar, as you would with building a brick wall. Very ingenious and a work of art!
.jpg)
.jpg) Every now and again you see a project like this that lifts the spirits. Such an exciting and impressive creation that is beautifully crafted and wonderfully original. Using old tropical hardwood railway sleepers as building blocks is both effective and remarkably attractive, and bedding the individual railway sleeper pieces on mortar frames each weathered timber piece beautifully. A mini masterpiece.
Every now and again you see a project like this that lifts the spirits. Such an exciting and impressive creation that is beautifully crafted and wonderfully original. Using old tropical hardwood railway sleepers as building blocks is both effective and remarkably attractive, and bedding the individual railway sleeper pieces on mortar frames each weathered timber piece beautifully. A mini masterpiece.
7) Pure gravity
 The advantage of gravity, is that it's free. You don't have to buy it from a DIY shop, it doesn't break down, and it comes with an eternal guarantee, which is good value in days of austerity and high inflation. Gravity is the powerful force that glues our universe together, so it should comfortably keep a few railway sleepers on the ground. You just need to make sure that they are positioned on a flat surface. Put anything on an unsteady slope and it will tumble over. Place it on level ground and it is steady as a rock. You just have to make sure your railway sleepers are not disturbed by wind, floods or grandchildren!
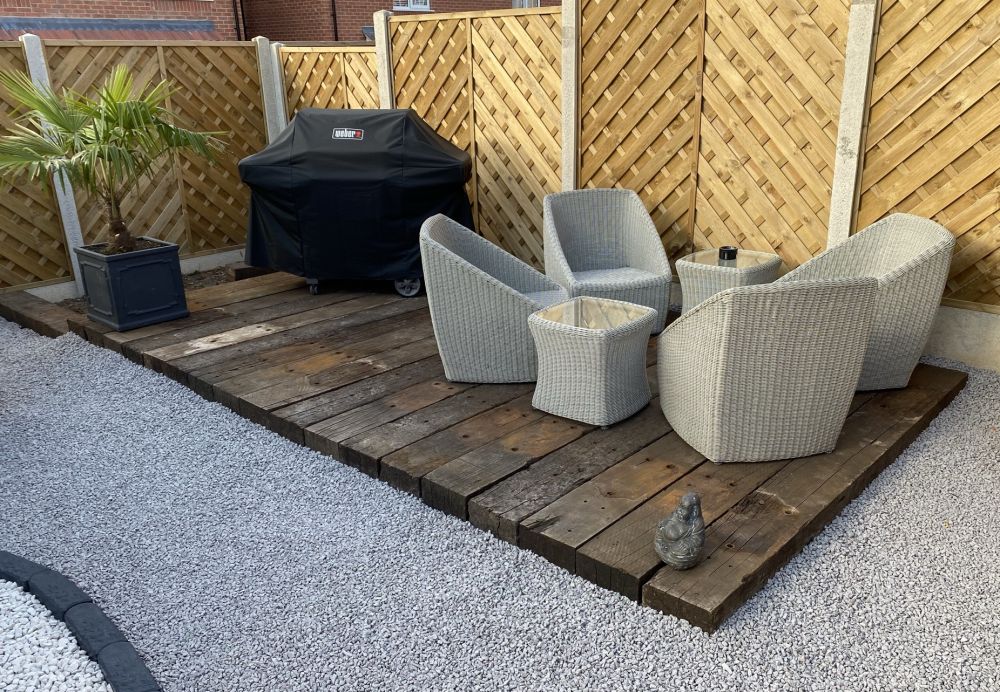
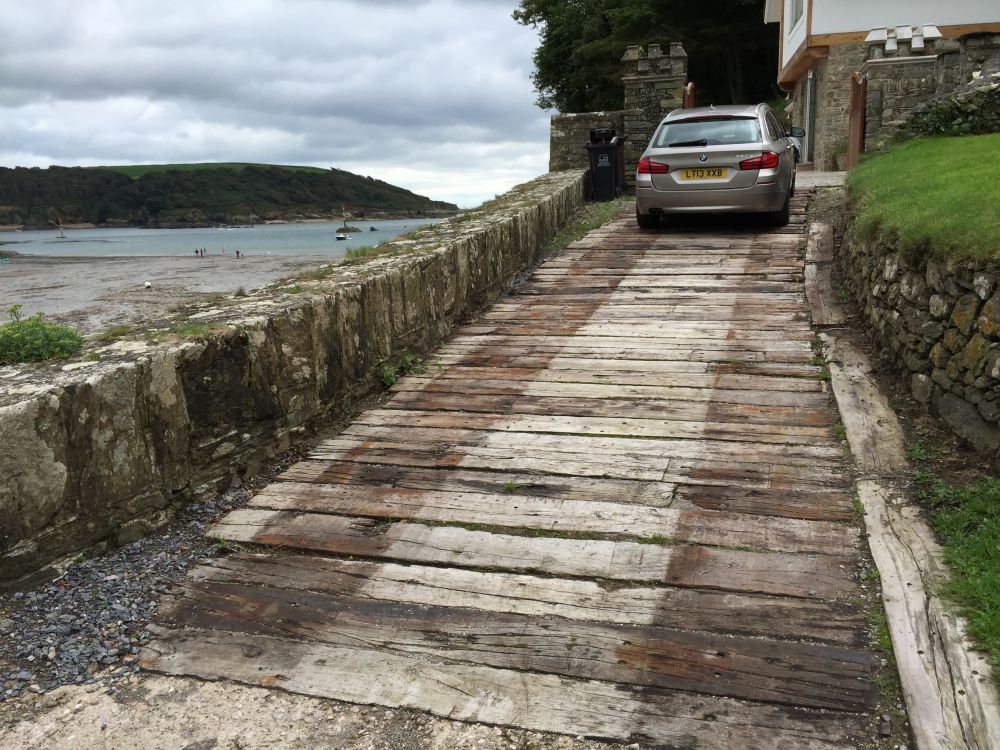 The most common projects in which people rely on simple gravity to hold their railway sleepers in place are normally ones where there is just one layer placed on the earth or hardsore. Edging to a lawn or patio. A wooden pathway or drive to park your cars on. A wooden deck with railway sleepers laying flat on the ground. None of these landscaping projects should ever escape the stabilising pull of gravity. However, once your ambitious constructions are stacked several layers high, it is wise to add in retaining posts, brackets or screws to keep your handywork safely in place.
BUY ONLINE or
RING DIRECT

0115 9890445
enquiries@railwaysleepers.com
WHICH
RAILWAY SLEEPERS ARE
THE BEST?
JUST A CLICK CLICK CLICK AWAY
INSPIRATION?
NEED IDEAS?
CLICK for the WORLD'S
LARGEST COLLECTION of
RAILWAY SLEEPER PROJECTS
SHARE
your project and creation
SEND your PHOTOS to
enquiries@railwaysleepers.com
or WhatsApp 07816 959310
CONFUSED?
Need some advice?
CONTACT US & we'll help you
work out what items you need.
0115 9890445